Showing posts with label crafts. Show all posts

Wednesday, February 20, 2013

Pretty in Pink. A DIY.

Hello! This week's post is brought to you by creative Kristen. It's been a while since she's appeared in life, but it's good of her to show up for a little while, wouldn't you say?

I started searching for a make up brush roll, mostly because I want to keep my brushes in good shape. The ones I came across all seemed to be too industrial looking. Black...pleather...ugly. Make up is supposed to enhance beauty, so shouldn't a make up brush roll be beautiful? Obviously the make-up-brush-roll-makers haven't done the math.

After digging through some craft supplies, I skeptically started to sew. And it turned out! Here's how I did it.
 Time frame:
Amateurs like me: about 1.5 hours
Pro's: 2.5 minutes


You'll need: 2 colours of fabric (or one. If you're feeling monotone), a plastic sheet protector (or any kind of thin plastic), a sewing machine, stamps (optional), 2 pieces of ribbon, and the tallest items you'll be putting in your roll. 


1. Iron your fabric. See that wrinkly fabric in the first photo? Not nice. 

2. If you've chosen a solid colour for the inside, and wish to stamp it, go for it! I used my new camera stamp from The Plaid Barn (thanks sis!).


3. Cut 3 pieces of fabric, 2 the same size (inside - printed fabric, and outside of your roll), and 1 piece for the pocket (same width, about half the height. Use your brushes to see how tall this piece should be). I chose my outside to be pink, and the pocket to be pink. I didn't measure here, just did some official sewing lady guesswork. 

4. Hem the side edges, and the top edge of your pocket piece of fabric. 

5. Sew the plastic sheet to your inside fabric. This is to protect that lovely printed fabric from getting full of make up dust. My plastic wasn't quite big enough to cover the entire thing, but it works just fine. 

6. Sew the bottom and side edges to the printed piece of fabric. Sew some pockets. I did various sizes.


7. Find your outside piece of fabric and 2 pieces of ribbon. I had to do some more guesswork here to figure out how far to sew the ribbon so it will still tie when rolled. I basically filled my pockets of the inside piece, placed it against the outside piece, rolled it up, then measured the circumference of the roll. Mine was about 20 centimetres. After being unrolled, I decided to sew from about 5 cm - 20 cm, to leave some tying room on the ends of the ribbon.


8. After the ribbon is sewn, place the right sides of the outside piece, and the inside piece together, tucking the ribbons into the centre so you don't sew them! Sew 3 sides, flip right side out, fold last edges inward, and sew.

9. It's done! I filled mine with more than brushes. And it's wonderful.


Here's the little project all rolled up. Works wonderfully at home and for travelling. 

What do you think? Would you try this easy sewing project? My instructions aren't amazing, and I am definitely still learning, but it was a fun project. 

Have a lovely rest of your week!

Thursday, January 17, 2013

Inspiring the Day {Part 1...of many}

It's halfway through January? Where did time go? I won't argue though, I'm ready for warmer weather. When you experience snow 6+ months a year, you get to that point, often happens in January. It's time for some green grass! Where are you in the world? Is it warm? Send some warmth, please.

I have been passing those long winter month by doing lots of wedding planning! Cause of this fine piece of jewelry! 


Anyone else have that giant hand problem?


This was the method of proposal on that warm December day. It sits around my house, and I get to relive the moment anytime I want! Did you know you can order a reel with whatever photos you want? It's true. See it here. 


Now that we have most of the big stuff booked (or almost booked. Just looked at a to-do list...), the fun part is underway! Here is a little colour inspiration board. By the magic of paint chips (and many wedding planning apps), we can begin to see the day! It's going to be wonderful, and I am so excited that I get to plan it with my dearest friend and love. And then we get to share the most special day under God with our dearest friends and family! Weddings are just the most wonderful things. 

Saturday, October 13, 2012

DIY Cookbook

Today brings you yet another seasonal themed post! I have a ongoing project this autumn that I have been working on. My cookbook! I have a rule for it. I can only add recipes that I actually have eaten and like. So often, I buy a cookbook that I think looks so delicious, but only end up trying one recipe, and either not being impressed, or totally forgetting about the cookbook and having it get dusty in my cupboard. With my 'only tried recipes' rule, I have a cookbook to keep going back to, and it gets well-used! 


I found this old Betty Crocker cookbook while thrifting, and decided it was really okay to cover up some of these dated recipes with my own. Some of them I'll keep, such as a pie crust recipe! I'll definitely need some help with that - Thanks Betty! 

This project is really enjoyable to me, as I used to be an avid scrapbooker. This got kind of old, as printing off photos seems to be few and far between (and the scrapbooker scene isn't quite as cool as it once was. I'm sure there are cool scrapbookers out there - hello to you!) This scrapbooked cookbook allows me to be creative, which I love. I need that creative outlet! Little drawings, pretty paper, and stamps adorn the pages. Over the years, eventually, my little book will be filled with recipes I love! 


{this peanut butter chocolate cookie recipe is the best!}

Does autumn put you in a cooking mood? 

Enjoy!

Thursday, October 4, 2012

Thanks.

Thanksgiving is nearly here! I love this time of year. I am thankful for a fantastic family, a pretty snazzy boyfriend, an enjoyable job, and a class that I like. I'm also thankful for days off! I started today off with a run outside gazing at the autumn leaves (before you think: wow, she's dedicated. Know that this may have been a one time thing), just took some pumpkin bread out of the oven from this new recipe, and am trying not to be too jealous of my roommates who get to go be with family for the weekend while I work through the weekend. 

As the weather gets cooler, I seem to get craftier. Remember these cute magnets I made with cork? I seem to have an abundance of cork afterwards. So I whipped up an inspiration corkboard! Here's how I did it.


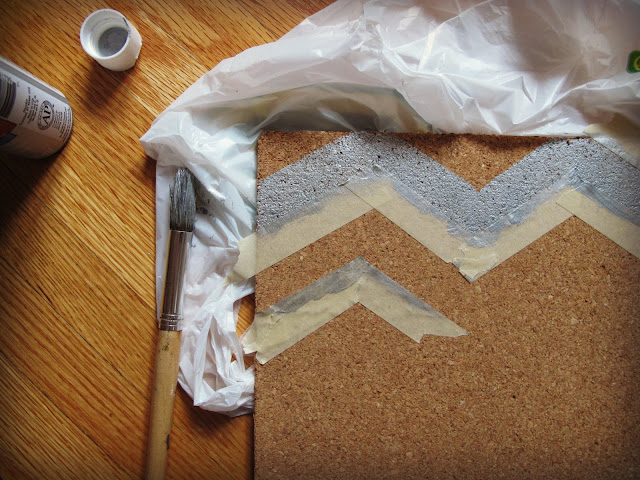
Started off with a cork tile - dollar store. or Kristen's house. I have so many, it's sad -, some paint of choice - I chose metallic silver - and a paintbrush and tape. 


Tape off your design and paint your design! I chose chevron. Cause it's SO in right now. 


I glued mine to a second cork tile for thickness, attached it to my wall with 3-m poster strips, and added a little inspiration. Paint samples for fall wardrobe inspiration, and memories from summer that I want to keep in mind. Easy as pie! Or pumpkin bread.

Where does this thanksgiving weekend bring you?

Enjoy!

Saturday, September 15, 2012

Magnetic Attractions.


There has been lots going on in my end of things, hard stuff. Really hard stuff.

 Here's something easy, fun, and just plain simple to do this weekend. 


Get your supplies together. An old, unused computer keyboard, pliers, magnets, and cork (not pictured). 


Use pliers to get the keys off that you want to use {can you guess what I'm going to spell?}. On some keyboards, it might be easiest to take the back panel of the keyboard off, and pop out the keys from the back. But on this one, it was easier to use my brute strength and ply them off.


Make sure you have the right letters, spelt right...


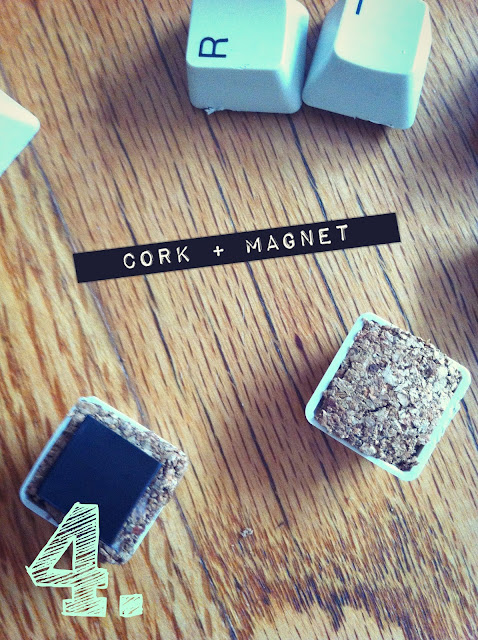
Glue some cork pieces on the backs of the keys before you glue on the magnets, since they will most likely be hollow. I found this out the hard way. Had to run out mid project and get some cork. 

And stick them on your fridge! An easy way to recycle an old keyboard. 

Any other ideas to use the rest of this keyboard?

Enjoy!

Tuesday, June 5, 2012

5 Minutes to Organized Recipes.


Hello again! It's been a busy week for me. Working lots, celebrating my birthday, and enjoying some fantastic sunshine! 

In my new house, I don't really have a creative space yet, but I was able to start working on some recipe cards, as I've been slowly adventuring into some baking and cooking. For this quick little project, I took a tea storage container, pretty index cards, and a few of my recently tried recipes that I want to keep on hand. 

I simply cut the index cards in half to fit into the tea boxes, and wrote out the recipes! I decided that I am going to add some pretty stamps and embellishments on the cards as I keep working on them. Cute, aren't they?

What have you been up to? Feeling creative lately?

Enjoy!

Tuesday, May 29, 2012

Project Inspiration.

I went to Michael's craft store today and spent under $10! So proud of myself. Do you ever go into a store, no list, just looking to buy some super great things at super low prices? I love doing that every once in a while. Not at all budget conscious! I think the trick is to set a budget for the outing BEFORE hand. I didn't do so this time, but as I stood at the till, I quickly tallied up all my finds and was pleasantly surprised! Even more surprised that my math was correct when she rang them in. $9.52! And the inspiration is flowing!


What's your opinion? With these supplies:


What kind of projects would you embark on?

The possibilities are endless!

Enjoy!

Thursday, March 22, 2012

DIY Thursday

I finally had time to do something a little more creative than writing papers! I made coasters for my boyfriend. Here's how to do it!


And that's it! They turned out really well. I got the idea here. They screen printed the pictures on, but a permanent marker worked fine for me! And once the mod podge went on, it's waterproof and heat resistant (I'm not guaranteeing this..don't sue me).


He really liked how they went well with his Iphone case. Success!

Enjoy!

Saturday, February 11, 2012

What a Card {No. 2}

You've probably heard, but on Tuesday, there is a certain holiday called Valentine's Day! I actually really like this day, though some people get bitter about it, I think it's fun no matter what your relationship status. 

I spent the day finishing off my valentines that I've been making for some friends. I won't take credit for all the incredibly cheesy (but cute) sayings I used, but I don't remember where I found them all. I had such fun making these! What do you give out on Valentine's Day?


Enjoy!

Thursday, February 9, 2012

What a card.


I've had few chances to be crafty the past couple weeks! One thing that keeps me creative is making cards now and then. I'm not a hard core card maker, but It's so wonderful to have a stack of cards ready to give out the second you think of it. Especially with Valentines Day coming up, and it's always nice to give out cards to your loved ones around this time. I'm making some pretty cards for that occasion, I'll post them next week!

Here's some of my favourite things to do with cards:

1. Film (pictured) - If you find any old rolls, don't through them out! Keep them, cut off a strip, round the corners if you like, and embellish a card!

2. Sewing - I have no idea what kind of damage running paper through a sewing machine does, but it looks really pretty! I love doing a wide zig-zag pattern when stitching on paper.

3. Paper folding - I found some Origami paper and kept folding triangles until it looked neat! 

Here's a neat one I found, Valentine's themed. 


                                                                     Source: smg.photobucket.com via Carrissa on Pinterest


What are your favourite card making tricks?

Enjoy!

Wednesday, January 18, 2012

DIY Wednesday.

A new feature perhaps? DIY Wednesday?

I love the look of this! I think I'll try it soon. 

                                                                      Source: witandwhistle.com via Kristen on Pinterest


...when I have time. These past few days I've hardly had a moment to sit! Memorizing lines for a drama production coming up, getting all the syllabi for the coming semester, starting regular classes, and starting teaching again. My goodness, I just want to craft!

What's a project you want to attempt? 

Enjoy!

Sunday, January 15, 2012

Practical and Pretty.

A blustery January day over here! I've been taking advantage of this indoors day to update a few things in the small space I call home. 


1. A practical and pretty way to store hair bands:

Embroidery hoop
Safety pin 
Fabric


2. A practical and pretty way to store sewing supplies:

Mason Jar
Fabric
Stuffing
Minimal sewing supplies


3. A practical and pretty way to store sunglasses:

A wooden pants hanger
Ribbon or String
Your assortment of sunnies.

How do you store things in a practical and pretty way?

Enjoy!

Thursday, January 12, 2012

Have a calendar.


It's January, and it's module class week here at school. And I'm enjoying my class, but it's a lot of sitting. Full days of the study of the book of Mark, so I drew up a little January calendar. It's a little crooked, but it helped me focus nicely!

You're welcome to have it! Let me know if the quality is bad, and I can re load it in a different size.

Enjoy!

Oh! I have been busy with class, but I have been documenting my outfits this week. Stay tuned for an outfit post this weekend giving you a few outfit ideas to stay cozy and classy while sitting in class all day. 

Saturday, July 2, 2011

Sisters in the City.

July entered the world this year with fantastic weather. And how better to enjoy it than with a picnic with two of my sisters in the park?

Jenni enjoyed some nectarines, and Hannah enjoyed a refreshing blended strawberry lemonade.


Then we all enjoyed some photos.

The photographer, attempting to capture her muse.

She is one with the trees! Nature woman, we like to call her. Or the Organic sister.


Also, I found this neat idea on ReadyMade. I had been looking for a way to hang this piece. Isn't it a creative way to hang art?


And if you have excess wooden hangers after that project, try this out.

Are you enjoying sunny weather? Or are rainy days your forte?

Enjoy!

Wednesday, March 16, 2011

Craft Withdrawl

It's a real disease. Craft Withdrawl symptoms include:

-inability to enjoy every day mundane tasks
-extreme longings to compose something from scratch, particularly one that looks beautiful
-craving to complete a project, to gain that crafty satisfaction

These, as well as others symptoms, are normal with Craft Withdrawl. If you, or any loved ones you know are experiencing these symptoms, a suggested remedy is to spend a day with your mom, not worrying about the outside non-crafty world, and sew a beautiful, useful project (i.e. a laptop sleeve!)


3 layers of healing for the top of the sleeve...


3 layers for the bottom.


a patchwork fold-over to complete the remedy for my withdrawl.


Amidst the healing process...


and...Cured!


my laptop will be safe, and I am cured of my Craft Withdrawl!

If you are looking for a similar remedy, check out the full tutorial (CA - Crafters Anonymous, also known as Sew, Mama, Sew) here. Here's the PDF version as well.

Enjoy!